In our digital age, USB flash drives have become essential for transferring, storing, and backing up data. With capacities ranging from a few gigabytes to terabytes, these portable storage devices have revolutionized how we carry and share information.
However, there is a common frustration that many users encounter: a USB drive not showing its full capacity. If you have ever faced this issue, you are not alone. In this blog, you will learn the causes behind this problem and explore the steps you can take to resolve it.
Understanding the USB Drive not Full Capacity Issue
You may have purchased a USB flash drive with a labeled capacity of, for example, 64GB. Still, upon plugging it into your computer, you notice the available space is significantly less. This can be perplexing and worrying, especially if you have important data to store. The problem might manifest as “unallocated space,” leaving you puzzled about where your storage has gone.
Possible Causes of USB Flash Drive Capacity Not Correct
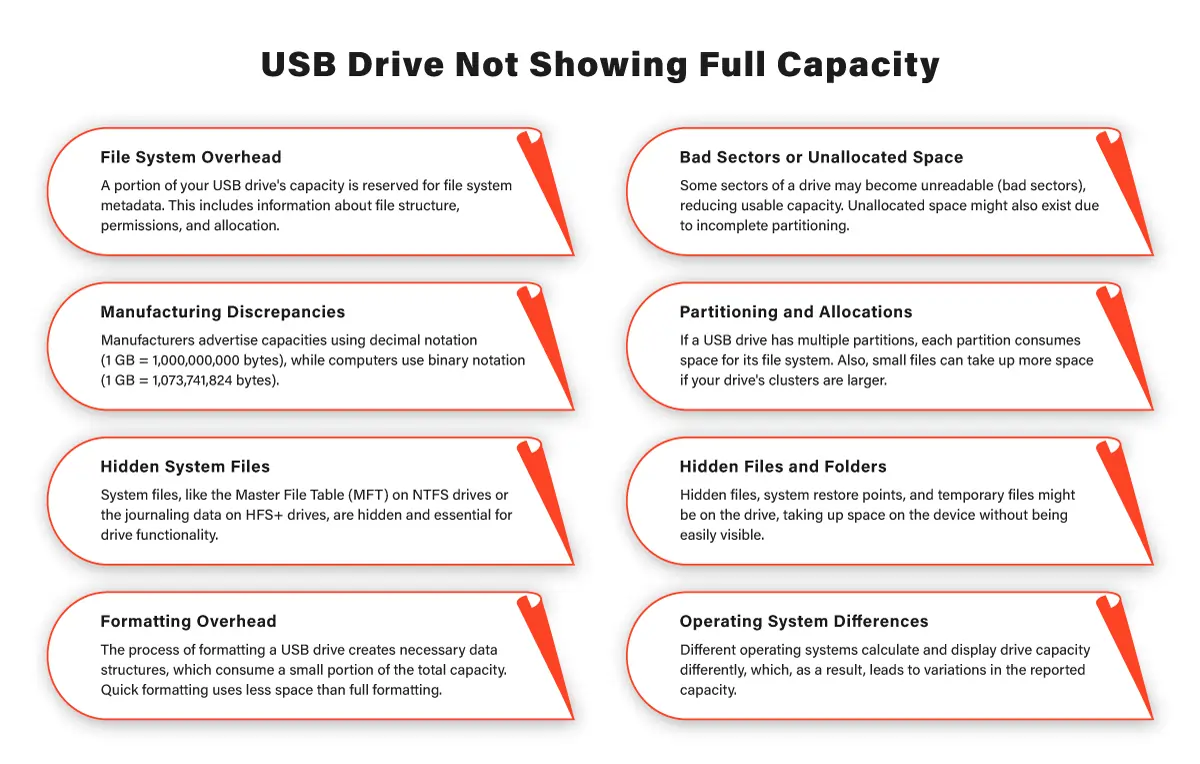
- Manufacturing Discrepancies. One of the common reasons for a USB drive not showing its full capacity lies in manufacturing variances. Manufacturers often round up the capacity for marketing purposes, but the actual usable space can be slightly lower due to formatting and file system overhead.
- Hidden System Files. System files, like the file allocation table, are required for your computer to interact with the drive. These files are often hidden but occupy a portion of the drive’s capacity. While these files are essential, they can take up a noticeable amount of space on smaller drives.
- File System and Formatting. A certain amount of space is allocated for system structures when a USB drive is formatted. Additionally, the choice of file system (FAT32, NTFS, exFAT, etc.) affects how much space is allocated. Some file systems use larger cluster sizes, which can result in more space being used for small files.
- Bad Sectors and Disk Errors. Bad sectors or disk errors can also contribute to the capacity issue. When a sector becomes unreadable or is marked as bad, the operating system might exclude it from use. This can lead to a reduction in available storage space.
Resolving the USB Flash Drive Not Showing Full Capacity
1. Inspect the Drive. First, ensure that the drive is properly plugged in. Sometimes, a loose connection might lead to inaccurate readings. If the issue persists, try plugging the USB stick into a different USB port or computer to rule out any local issues.
2. Check in Disk Management. Accessing the Disk Management utility in Windows can provide insights into the drive’s current state. To do this, press the Windows key, type “Disk Management,” and hit Enter. Look for your USB drive in the list. You might find unallocated space or partitions that have not been assigned drive letters.
3. Use the Command Prompt. If your drive isn’t showing its full capacity, you can use Command Prompt to attempt to fix the issue. Type “cmd” in the Windows search bar, then right-click on “Command Prompt,” and select “Run as administrator.” In the Command Prompt (CMD) window, type “diskpart” and press Enter. Then, type “list disk” to see a list of all connected disks.

4. Select and Clean the Drive. Identify your USB drive by its size and type “select disk [number]” (replace [number] with the appropriate disk number) and press Enter. Then type “clean” and press Enter. This will remove any existing partitions and data on the drive.
5. Create a New Partition. Type “create partition primary” and hit Enter. This will create a new primary partition on the flash drive. Once done, type “exit” to exit the diskpart utility.
6. Format the Drive. In the Command Prompt window, type “format fs=ntfs quick” (you can replace “ntfs” with your preferred file system) and press Enter. This will format the drive with the chosen file system.
7. Assign a Drive Letter. After formatting, go back to Disk Management. Right-click on the partition you’ve just created, select “Change Drive Letter and Paths,” and assign a letter to the drive.

8. Reboot the System. Sometimes, changes might not take effect until you restart your computer. Reboot your system and check if the drive’s capacity issue has been resolved.
9. Check for Bad Sectors. To check for bad sectors and disk errors, you can use Windows’ built-in tools. Right-click on the drive, select “Properties,” go to the “Tools” tab, and click on “Check.”
A USB drive not showing its full capacity can be a perplexing problem, but armed with the right knowledge, you can address it effectively. Remember that slight discrepancies between labeled and actual capacities are not uncommon due to formatting and system files.
However, if the difference is significant, following the steps outlined above can help you rectify the issue and restore your drive back to its full potential. With a little technical know-how and patience, you can overcome this challenge and continue using your USB drive with confidence.
Frequently Asked Questions
Why is my USB drive not showing correct capacity?
USB drives often have manufacturing discrepancies, hidden system files, or formatting-related factors that can result in a difference between labeled and actual capacities.
Can I fix the flash drive not full capacity issue on my own?
Absolutely. By following our comprehensive guide, you can troubleshoot and potentially resolve the issue using simple steps and tools provided by your computer’s operating system.
How do I check for bad sectors on my USB drive?
After resolving the capacity issue, you can use Windows’ built-in tools. Right-click on the drive, select “Properties,” navigate to the “Tools” tab, and click on “Check” to scan for and repair bad sectors.
What file system should I choose during formatting?
The choice of file system depends on your needs. NTFS is recommended for most cases due to its robustness, support for larger files, and security features.
Will I lose any data during the formatting process?
Yes, the process involves formatting and potentially deleting partitions, which will result in data loss. Be sure to back up your data before proceeding with the troubleshooting steps.
"*" indicates required fields